Since
DicE No.31 came out, I've been asked so many times how I made the cover I thought I'd share some of the step-by-step pics of the process with you. Some people think I made the tin toy but, although I would have loved to have been able to do that, I decided that it would be more 'realistic' if I did it with smoke and mirrors!
I started with a basic drawing of what I would like to do. I was really keen to use the DicE title in the art somehow, rather than as an add-on, so I decided to make the box for the tin toy and put it on that.
I obviously imagined it as a Harley at this point, and had included a tin skateboard accessory.
I scoured the internet looking for potential victims for my chopper. This was the donor bike - the chopper used its frame, wheel, mudguard, headlamp and clockwork movement.
The tank is American, from an "Indian". The front end is off a very early 1910s flattanker. I discovered that nobody seemed to have made Triumphs in tin, so the engine was built from spares. I stretched and twisted the bars in Photoshop to the desired apes.
The rider is shown here in his original hat. He was actually a cameraman on top of an outside broadcast truck in an old book I have, hence the earphones and stylish jaunty cap.
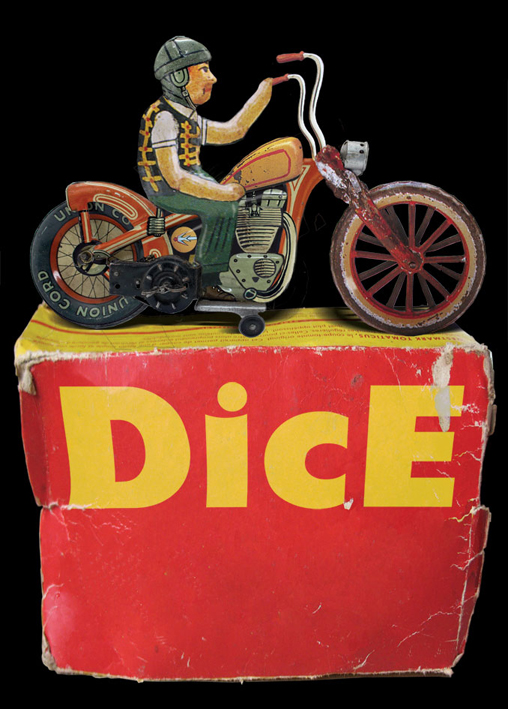
So... what box to use to get the right amount of worn cardboard? That's right, the TOMATICUS, the ultimate in labour-saving tomato cutting technology.
As you can see, the box was entirely the wrong proportion for the toy to fit in, so I had to stretch it.
Here he is with his helmet on, and a new improved leg. He is now also holding on to the handlebars, something which is generally conducive to safe riding. He has some shadows. The box has been stretched and the DicE title added and worked in to the wear on the box.
Next I worked on the illustration for the box. The important thing to remember with toys is that the picture on the box should be at least 15-20 times more cool and exciting than the actual toy.
This was the last point before it was finished. Laid down a sheet of plywood I happened to have in my studio and took a photo of it, placed the box on the wood and worked on the shadows and stuff.
And that's how I done it.


Remarkable!
ReplyDeleteAnd it's utterly brilliant!
ReplyDeletethanks for sharing your process.
ReplyDelete